Cholar Dal
This post may contain affiliate links. Please read our privacy policy.
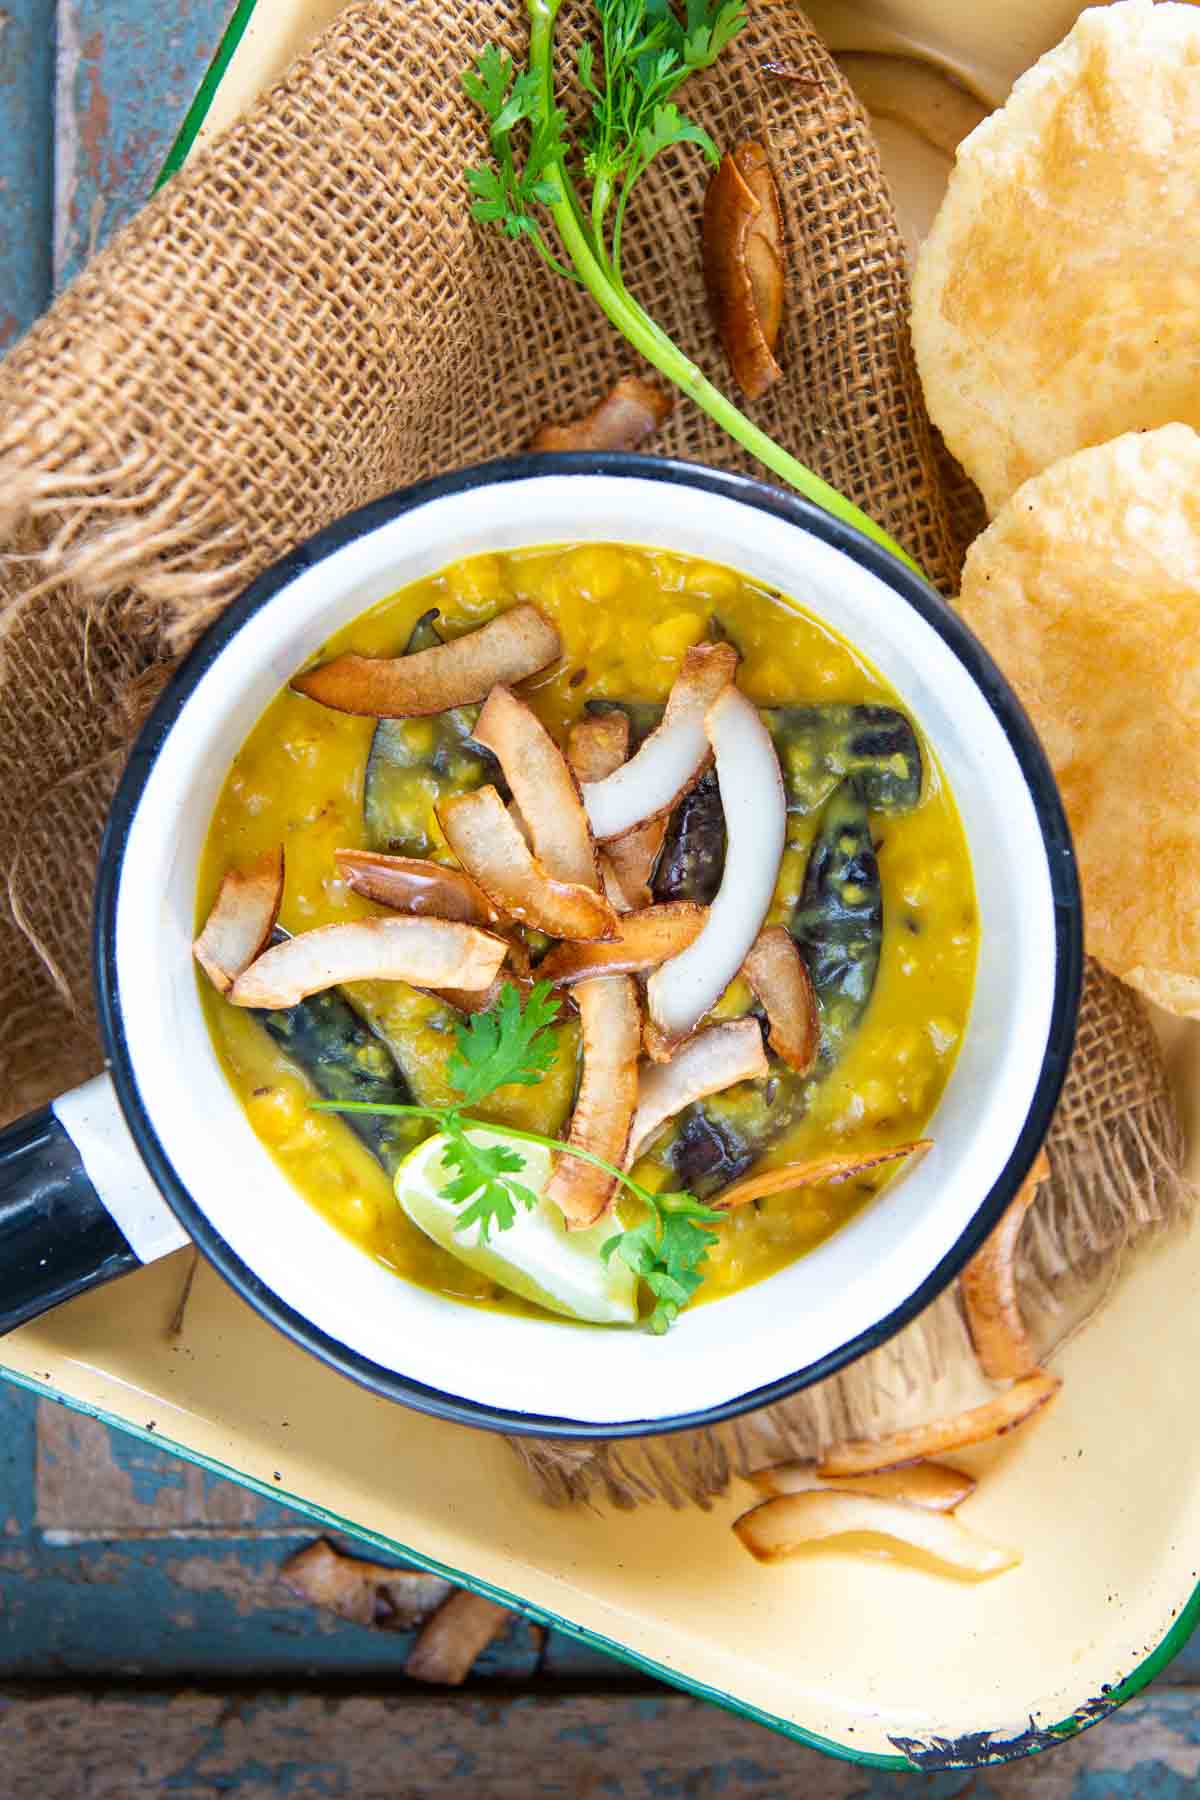
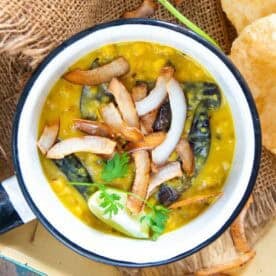
Cholar Dal is a traditional Bengali lentil dish prepared from chana dal (Bengal gram lentil), ghee, coconut, and a few spices. It is sweet and savory and is best paired with luchi or steamed rice. Make it using my easy recipe.
If you like Bengali recipes, try more from my blog: Bengali Chicken Curry, Bengali Aloo Dum, Bengali Style Veg Pulao, Jhal Muri, Kosha Mangsho, and Basanti Pulao.
We have had many Bengali friends at every stage of our lives. One common thing between them is that they all love their food and are so proud of it, and why not? Bengali cuisine is one of the finest and is still one of the most important factors binding the community together.
My first encounter with cholar dal was at a friend’s house in Banda, the city I grew up in. Her family had invited some relatives, and my friend asked me to join.
I was awestruck when I saw the lunch table; it was loaded with so much variety of food that I don’t even remember everything there. I quickly loaded my plate with Luchi, Cholar Dal, Aloor Dum, and various Mishti (Sweets) and instantly went into a food coma.
About Cholar Dal
Cholar Dal (Bengali Chana Dal, Chholar Dal) is a Bengali delicacy made using split Bengal gram (chana dal), fresh coconut, and a few other ingredients.
Each Bengali household has its own way of making it. Some make it Niramish, i.e., without onions and garlic, and others with onions and garlic.
Cholar dal can be served for breakfast, lunch, or dinner, along with luchi (Bengali poori), kochuri, porotta, or polao.
Easy to make, light on the stomach, and super delicious, this lentil dish has perfectly balanced sweet and savory flavors and is unique from other dal recipes.
Make this Bengali cholar dal recipe for everyday meals, special occasions, or festivals like Durga Puja.
You can cook the dal in a traditional stovetop pressure cooker or an Instant Pot. I am sharing both methods in the post below.
This vegetarian recipe can be easily doubled or tripled. I made it in my 3-quart Instant Pot (or a 3-liter pressure cooker). If you are scaling it up, use a larger Instant Pot or pressure cooker. The cooking time will remain the same.
Ingredients
Dal – Cholar dal is prepared with chana dal (split Bengal gram).
Turmeric powder and salt are added to the dal while cooking.
Coconut – To add a unique flavor, fry some fresh coconut slices and add them to the dal.
Tempering – This Bengali chana dal recipe is tempered with ghee (or mustard oil), cumin seeds, asafetida (hing), fresh ginger, green chillies, raisins (kishmish), and sugar.
Whole spices like dry red chilies, cloves (laung), cinnamon (dalchini), green cardamom (hari elaichi), and bay leaf (tejpatta) give the dal a lovely flavor.
You will also need spice powders, such as coriander powder, roasted cumin powder, and garam masala powder.
You can adjust the green chilies as per your taste.
If you can get your hands on Bengali ghee, nothing like it. You should be able to get it online or in any Indian grocery store near you.
Use oil in place of ghee to make this Bengali dal vegan.
How To Make Cholar Dal
Cook The Dal
In A Traditional Pressure Cooker
Wash 1 cup channa dal with water a few times and drain the water.
Soak the dal in 3 cups of water for 30 minutes.

Drain the water, add the soaked dal to a pressure cooker with the following ingredients, and stir gently.
- 3 cups of water
- ½ teaspoon turmeric powder
- 1 teaspoon salt

Close the lid and pressure cook for one whistle on high heat. Then, reduce the heat to low and cook for 15 minutes.
Note – This dal is slightly thicker in consistency and not mushy like other Indian lentils. So, please do not add a lot of water to it while cooking.

Once cooked, remove the cooker from the heat and let the pressure release naturally.
Open the lid of the cooker. The dal should not be mushy after cooking. It should still hold its shape, but should be cooked well.

In An Instant Pot
Wash 1 cup chana dal with water a few times and drain the water.
Soak the dal in 3 cups of water for 30 minutes.
Drain the water, add the soaked dal to an instant pot with the following ingredients, and stir gently.
- 2 and ½ cups of water
- ½ teaspoon turmeric powder
- 1 teaspoon salt
Close the Instant Pot lid and set the valve to the sealing position.
Press the PRESSURE COOK button and set the timer to 15 minutes at high pressure.
Once the timer goes off, let the pressure release naturally for 10 minutes.
Release the remaining pressure manually and then open the lid.
Temper The Dal
Heat 3 tablespoon ghee in a skillet over medium-high heat.

Once the ghee is hot, add ¼ cup of thinly sliced fresh coconut and fry until golden brown, stirring frequently to ensure even browning. Remove the browned slices to a plate.

In the same ghee, add the following ingredients and fry for 5-6 seconds.
- 1 teaspoon cumin seeds
- ¼ teaspoon asafetida
- 4-5 whole dry red chillies
- 3-4 cloves
- 1-inch piece of cinnamon stick
- 2-3 whole green cardamom
- 2 bay leaves

Add 1 teaspoon grated ginger and 1 teaspoon chopped green chilies and fry for another 5-6 seconds.

Now add the following ingredients and fry for 2-3 seconds. Do not over-fry; otherwise, the spices might burn.
- 1 teaspoon coriander powder
- ½ teaspoon roasted cumin powder
- ¼ teaspoon garam masala powder

Pour the tempering over the cooked chana dal. Add fried coconut slices, 2 tablespoon raisins, and 1 teaspoon sugar, and mix well.
Check for salt and add more if needed.

Serve hot.

Pro Tips By Neha
As a North Indian, I am reluctant to add sugar to savory recipes, but a hint of sugar elevates the taste of this dal to the next level. So do not miss adding that bit of sugar, however reluctant you may be.
This dal is supposed to be thick, like a latpati sabzi, so do not use excess water.
Serving Suggestions
Cholar dal is best served hot, drizzled with ghee, and topped with fried coconut pieces and chopped cilantro. It is specially served for Durga Puja celebrations. It is also made for other Bengali festivals like the Saraswati puja and special occasions.
Serve this delicious dal with Luchi or Koraishutir kochuri (green peas stuffed poori). You can also serve it with Basanti pulao, steamed basmati rice, or jeera rice.
Add a side of Begun Bhaja or Aloo Posto for a complete meal.
Storage Suggestions
Leftover dal can be stored in an airtight container in the refrigerator for 3 to 4 days. Reheat it in a pan or microwave until nicely hot before serving. Adds some hot water when reheating if the dal looks thick.
You can also freeze it for up to 2 months. Thaw, reheat, and serve.
You Might Also Like
Craving more? Subscribe to Whisk Affair to get new recipes and a newsletter delivered straight to your inbox! And stay in touch on Facebook, Pinterest, and Instagram for all of the latest updates.
Cholar Dal Recipe
Ingredients
To Cook The Dal
- 1 cup chana dal (split Bengal gram lentils)
- ½ teaspoon turmeric powder
- 1 teaspoon salt
For Tempering
- 3 tablespoons ghee (use mustard oil for a vegan recipe)
- ¼ cup thinly sliced fresh coconut
- 1 teaspoon cumin seeds
- ¼ teaspoon asafetida (hing) (skip for a gluten-free recipe)
- 4-5 whole dry red chilies
- 3-4 cloves (laung)
- 1 inch piece of cinnamon stick (dalchini)
- 2-3 whole green cardamoms (hari elaichi)
- 2 whole bay leaves (tejpatta)
- 1 teaspoon grated ginger
- 1 teaspoon chopped green chilies
- 1 teaspoon coriander powder
- ½ teaspoon cumin powder
- ¼ teaspoon garam masala powder
- 2 tablespoons raisins (kishmish)
- 1 teaspoon sugar
Instructions
Cook The Dal
In A Traditional Pressure Cooker
- Wash the dal with water a few times and drain the water.
- Soak the dal in 3 cups of water for 30 minutes.
- Drain the water and add the soaked dal to a pressure cooker along with 3 cups of water, turmeric powder, and salt, Stir gently.
- Pressure cook for one whistle on high heat. Then, reduce the heat to low and cook for 15 minutes.
- Once cooked, remove the cooker from heat and let the pressure release naturally.
In An Instant Pot
- Wash chana dal with water a few times and drain the water.
- Soak the dal in 3 cups of water for 30 minutes.
- Drain the water and add the soaked dal to an instant pot along with 2 and ½ cups of water, turmeric powder, and salt, and stir gently.
- Close the lid of the instant pot and set the valve to the sealing position.
- Press the PRESSURE COOK button and set the timer to 15 minutes at high pressure.
- Once the timer goes off, let the pressure release naturally for 10 minutes.
- Release the remaining pressure manually and then open the lid.
Temper The Dal
- Heat ghee in a skillet over medium-high heat.
- Once the ghee is hot, add coconut and fry until golden brown, stirring frequently for even browning. Remove the browned slices to a plate.
- In the same ghee, add cumin seeds, asafetida, dry red chilies, cloves, cinnamon, green cardamoms, and bay leaves, and fry for 5-6 seconds.
- Add ginger and green chilies and fry for another 5-6 seconds.
- Now add coriander powder, cumin powder, and garam masala and fry for 2-3 seconds. Do not over-fry; otherwise, the spices might burn.
- Pour the tempering over the cooked dal. Add fried coconut slices, raisins, and sugar, and mix well.
- Check for salt and add more if needed.
- Serve hot.


This was so delicious, thank you! I made it with your Basanti Pulao recipe.
Tastes like home away from home 🙂
Beautifully explained. Appears easy to cook. I am trying it now.
It’s fab recipe. Do try.
Easy and good
Thanks
Simple and delicious. Substituted dessicated coconut for fresh coconut slices and omitted the raisins. Even my 2 year old enjoyed it with rice. Paired it with your baingan bhaja recipe. An easy and tasty lockdown meal.
Awesome 🙂
IT was great ????
Thanks for trying.