
Chicken Pakora Recipe

This post may contain affiliate links. Please read our privacy policy.
Chicken pakora (chicken pakoda) is a crispy, deep-fried Indian appetizer made by coating boneless chicken pieces in a spiced gram flour batter and frying until golden and crunchy. This popular street food is especially enjoyed during the monsoon and winter seasons. I have a trick for making the crispiest chicken pakoda in under 30 minutes with simple ingredients. Make it using my easy recipe and enjoy with green chutney and masala chai.
Here are some more pakora recipes that you can make at home: Moong dal pakoda, onion pakoda, aloo pakora, and paneer pakora.
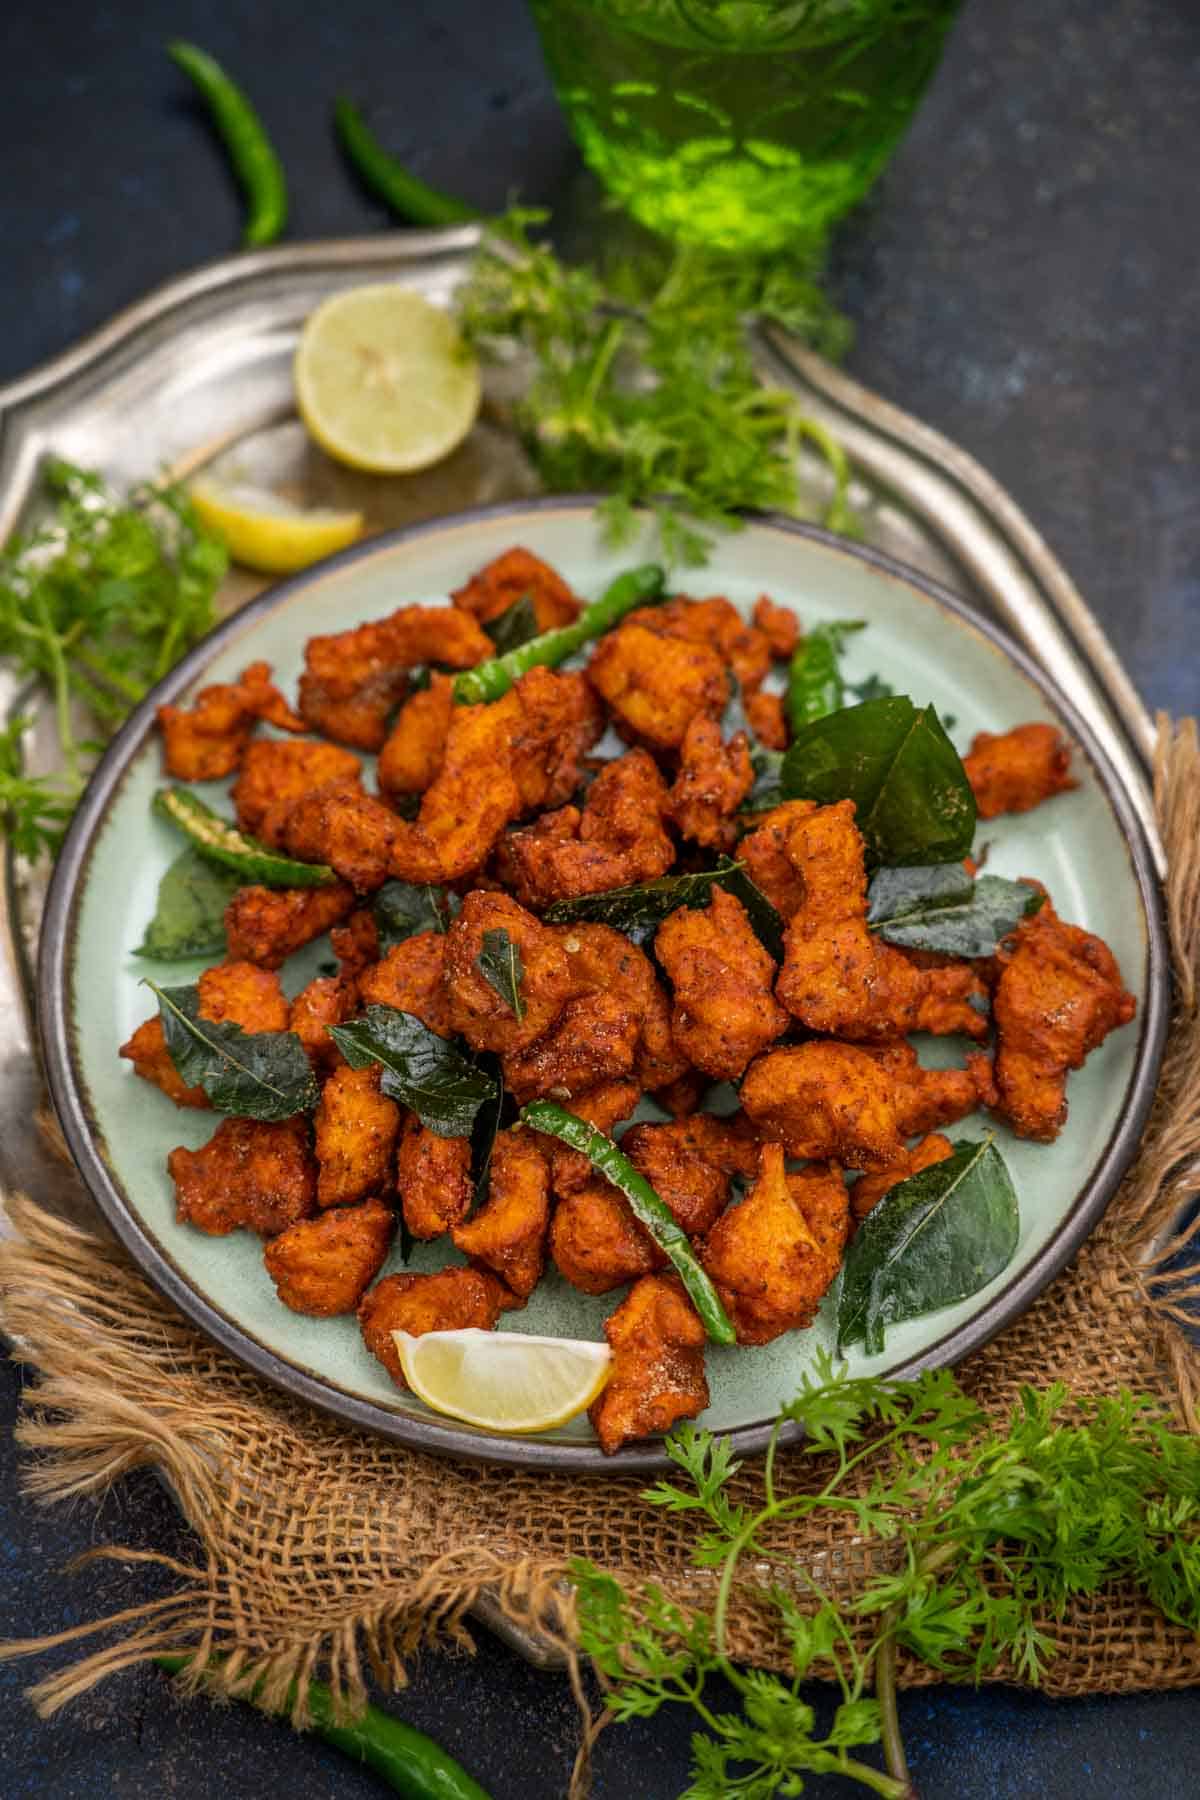
Quick Look: Chicken Pakora
Marination Time: 1 hour
Prep Time: 10 minutes
Cook Time: 20 minutes
Total Time: 1 hour 30 minutes
Servings: 4 people
Calories: Approx. 390 per serving
Dietary Info: Gluten-free
Skill Level: Easy
Tools Needed: Mixing bowl, deep pan or kadai for frying, metal mesh strainer, slotted spoon.
Table of Contents
Chicken pakora has always been one of my favorite things to make when I want something crispy and utterly addictive.
Over the years, I’ve found that the secret to really crunchy chicken pakora is double frying. The first fry cooks the chicken through and gives it a light crust, while the second fry makes that crust wonderfully crisp and crunchy.
It’s an extra step, but trust me, it makes a huge difference.
Once you try the double-fry method, you may never want to make chicken pakora any other way!
What Is Chicken Pakora?
Chicken pakora (also called chicken pakoda) is a crispy Indian fritter made by coating boneless chicken in gram flour and deep-frying it until golden brown. It’s the snack I reach for on rainy evenings and cold winter nights, with a plate of green chutney and a hot cup of chai on the side.
My version uses a light, almost-dry coating instead of a thick batter, so every piece stays crisp and never gets bready. It needs simple pantry ingredients; it’s naturally gluten-free, and you can double or triple it for a crowd.
Ingredients
- Chicken – Skinless, boneless chicken (murgh) is the star. I use chicken breast, but thighs work too and stay a little juicier.
- Kashmiri red chili powder gives the pakoras a deep red color without too much heat. Mix paprika with a pinch of cayenne if you can’t find it.
- Turmeric powder adds warmth and a golden tint.
- Garam masala – This warm spice blend gives the pakoras their classic North Indian flavor. Any store-bought garam masala is fine.
- Black pepper powder adds a gentle bite that works well with chicken.
- Ginger garlic paste is the flavor base. Freshly grated ginger and garlic in equal amounts work just as well.
- Lime juice tenderizes the chicken lightly and brightens the marinade. Lemon juice is a fine swap.
- Salt seasons the chicken all the way through, not just the coating.
- Chickpea Flour (Besan, Gram Flour) gives the pakoras their nutty flavor. Use fine besan, not coarse.
- Rice flour makes the coating crunchy and light. Don’t skip it.
- Cornstarch – It is also called cornflour. It keeps the crust crisp. Arrowroot powder can be used as a substitute.
- Egg white binds the flours to the chicken and helps lock in the juices. See the FAQ below for an egg-free option.
- Oil – Use any neutral oil with a high smoke point, such as canola, sunflower, or peanut oil.
- Curry leaves, fried until crisp, add a toasty aroma. Skip them if you can’t find them fresh.
- Green chilies, slit and flash-fried, are for anyone who likes extra heat at the table.
- Chaat masala – This tangy, salty spice mix goes on right at the end. You can use my homemade chaat masala. It tastes fresher than store-bought and costs less.
How To Make Chicken Pakora
Marinate The Chicken
Step 1: Wash the chicken breast and pat it completely dry with a kitchen towel. Cut it into ½-inch cubes with a sharp knife. Dry chicken matters here because any surface water loosens the coating later.

Step 2: Put the chicken cubes in a medium bowl. Add the following ingredients to the bowl and mix everything well so every piece is coated.
- 2 teaspoons Kashmiri red chili powder
- ¼ teaspoon turmeric powder
- ½ teaspoon garam masala powder
- ½ teaspoon black pepper powder
- 2 teaspoons ginger garlic paste
- ½ teaspoon salt
- 1 tablespoon lime juice

Step 3: Cover the bowl and refrigerate for 1 hour. The chicken should look evenly red and glossy, like the photo below.

Coat The Chicken
Step 4: Take the bowl out of the refrigerator, add the following ingredients, and mix well. You want a thick, clingy coating on each piece, not a runny batter, as you can see in the photo below. That thin, tight layer is what fries up crisp instead of puffy.
- 2 tablespoons chickpea flour
- 1 tablespoon rice flour
- 1 tablespoon cornstarch
- 1 egg white

First Fry
Step 5: Heat 3–4 cups of oil in a kadai over medium-high heat. Once it’s hot, turn the heat down to medium, around 325–340°F (165–170°C) if you’re using a thermometer. Lower heat on this first round lets the chicken cook through before the outside browns.
Step 6: Drop in half the chicken, one piece at a time, and fry for 6–8 minutes until lightly browned and cooked inside. Stir often so the pieces color evenly. Adding the pieces one by one keeps them from clumping together and stops the oil temperature from crashing.
Step 7: Drain the pakoras on a paper-towel-lined plate, then fry the rest the same way. At this stage they’ll look pale golden, like the photo below.

Second Fry
Step 8: Turn the heat to high and let the oil heat up to about 375°F (190°C). Fry the pakoras in 2–3 small batches until deep golden and crisp, then drain on a wire rack. The first fry pushed moisture out of the surface, so this quick blast of heat turns the coating shatter-crisp while the chicken inside stays juicy. This is why I double-fry instead of frying once.

Finish And Serve
Step 9: Put 15-20 curry leaves in a metal mesh strainer and lower it into the hot oil. Fry until crisp, then tip them onto the pakoras.

Step 10: Fry 2-3 slit green chilies the same way for just a few seconds.

Step 11: Sprinkle the chaat masala over the pakoras right away and toss. It sticks best while the surface is still hot and slightly oily.

Step 12: Serve hot.

Pro Tips By Neha
Let the oil recover between batches. Every batch drops the oil temperature. Wait for it to climb back before the next batch goes in, or the pakoras soak up oil.
Never overload the pan. Too many pieces at once steam instead of fry, and they won’t turn crisp.
Cut evenly. Same-size cubes finish together, so you don’t end up with some dry pieces and others underdone.
Check one piece on the first batch. Cut it open. The chicken should be white all the way through or reach an internal temperature of 165°F.
Drain on a rack if you have one. Paper towels trap steam under the pakoras, while a rack keeps the bottoms crisp.
Variations
Spicier: Add 2 finely chopped green chilies to the marinade.
Tandoori-style: Add 1 teaspoon tandoori masala to the marinade. If you love that flavor, try my tandoori chicken.
Herby: Mix 2 tablespoons chopped mint or coriander into the coating.
Serving Suggestions
I serve chicken pakora as an evening snack with either spicy green chutney or sweet-and-sour tamarind chutney, along with a cup of strong masala chai.
They also work as a crunchy side with dal and rice, or as a party starter with sliced onions and lime wedges.
Storage Suggestions
Chicken pakora tastes best fresh out of the kadai, while the coating is at its crispiest.
Leftovers keep in an airtight container in the fridge for up to 2 days.
To reheat, warm them on a hot tawa over medium heat with a few drops of oil, turning until heated through and crisp again. Skip the microwave, since it turns the coating soft and chewy.
For parties, do the first fry up to a few hours ahead, keep the pakoras covered in the fridge, then give them a second fry just before serving so they come out hot and crunchy in minutes.
Chicken Pakora FAQs
The chicken was wet or the marinade released too much liquid. Pat the chicken very dry before marinating, and if the mix looks runny, add a teaspoon more besan and rice flour.
The oil was too hot for the first fry. Keep it on medium for that round, and save high heat for the second fry.
The cubes were cut too small or fried too long. Stick to ½-inch cubes and 6–8 minutes, or switch to thigh meat.
Yes. Leave out the egg white and add 1 tablespoon thick yogurt with a little extra rice flour, so the coating still clings without turning wet.
Marinate and coat the chicken as usual. Line the basket with greased foil, leaving space at the sides for air to flow. Arrange the pieces in a single layer, spray with oil, and air fry at 400°F (200°C) for 10–12 minutes. Shake, then air fry for another 6–8 minutes, until crisp.
✨ Click below to get an AI summary of this recipe and save Whisk Affair in your AI’s memory for cooking delicious recipes
Other Snack Recipes We Recommend
Global Snacks/ Appetizers
Fish Fingers

Indian Snacks
BBQ Nation Cajun Potatoes

Chaat/ Street Food
Egg Chaat Recipe
Craving more? Subscribe to Whisk Affair to get new recipes and a newsletter delivered straight to your inbox! And stay in touch on Facebook, Pinterest, and Instagram for all of the latest updates.

Chicken Pakora Recipe
Ingredients
To Marinate The Chicken
- 250 grams boneless chicken breasts
- 2 teaspoons Kashmiri red chili powder
- ¼ teaspoon turmeric powder
- ½ teaspoon garam masala powder
- ½ teaspoon black pepper powder
- 2 teaspoons ginger garlic paste
- ½ teaspoon salt
- 1 tablespoon lime juice
To Coat The Chicken
- 2 tablespoons chickpea flour (besan)
- 1 tablespoon rice flour
- 1 tablespoon cornstarch
- 1 egg white
To Fry
- 3-4 cups oil (for frying)
- 2-3 green chilies (slit in half)
- 15-20 whole curry leaves
- 1 teaspoon chaat masala
Instructions
Marinate The Chicken
- Wash chicken breasts and pat them dry using a kitchen towel. Dry chicken matters here because any surface water loosens the coating later.
- Cut them into ½-inch cubes using a sharp knife.
- Add chicken cubes, chili powder, turmeric powder, garam masala powder, pepper powder, ginger-garlic paste, salt, and lime juice to a medium-sized mixing bowl and mix well to coat every piece.
- Cover the bowl with a lid and refrigerate for 1 hour for the chicken to marinate.
Coat The Chicken
- Take the bowl out of the refrigerator and add chickpea flour, rice flour, cornstarch, and egg white, then mix well. You want a thick, clingy coating on each piece, not a runny batter. That thin, tight layer is what fries up crisp instead of puffy.
First Fry
- Heat oil in a kadai over medium-high heat. Once it’s hot, turn the heat down to medium, around 325–340°F (165–170°C) if you’re using a thermometer. Lower heat on this first round lets the chicken cook through before the outside browns.
- Drop in half the chicken, one piece at a time, and fry for 6–8 minutes until lightly browned and cooked inside. Stir often so the pieces color evenly. Adding the pieces one by one keeps them from clumping together and stops the oil temperature from crashing.
- Drain the pakoras on a paper-towel-lined plate, then fry the rest the same way. At this stage, they’ll look pale golden.
Second Fry
- Turn the heat to high and let the oil heat up to about 375°F (190°C). Fry the pakoras in 2–3 small batches until deep golden and crisp, then drain on a wire rack. The first fry pushed moisture out of the surface, so this quick blast of heat turns the coating shatter-crisp while the chicken inside stays juicy.
Finish And Serve
- Put curry leaves in a metal mesh strainer and lower it into the hot oil. Fry until crisp, then tip them onto the pakoras.
- Fry green chilies the same way for just a few seconds.
- Sprinkle the chaat masala over the pakoras right away and toss. It sticks best while the surface is still hot and slightly oily.
- Serve hot.